The following is a collection of dogfighting tactics concerning pursuit and evasion. The tactics are generally applicable, regardless of craft type or whether the battle takes place in space or atmosphere.
Note that the article is a bit ahead of its time, making multiple references to atmospheric combat and missiles when neither is as of November 2007 present in the mod. Also note that video excerpts of these tactics in action will be supplied over time, mostly from BattleRecorder footage.
Terminology[]
Several terms are used in dogfighting that may require definition:
- Elements:A flight of four fighters is split into two elements. If we use as an example a flight of four X-Wings designated Red Group, Red Leader and Red 2 would make up the first Element, while Red 3 and 4 would constitute the second element. In this example, Red 3 would lead the second element, while Red Leader would lead his element as well as the flight group; Red 2 and 4 each act as a wingman for their element leads.
- Flight/Flight Group: A flight, aka flight group, is a unit of fighters operating together. Larger flights are divided into elements.
- Package: A package refers to several flight groups operating together, such as a flight group of TIE Bombers with a TIE Interceptor flight group providing escort.
- Trail: A formation is often built in such a way that the second element flies a distance behind the first. This is referred to as flying in trail.
- Lead (In elements): The Lead is the first member of a two-ship element operating in mutual support. The lead acts under the protection of his/her Wingman to engage and destroy enemy targets as the mission dictates. The lead in a flight of four fighters is known as Flight Lead.
- Wingman: A Wingman is the second member of a two-ship element operating in mutual support. The task of the wingman is to protect the element lead from enemy attackers, and will not fire upon the lead's targets unless tactics or orders dictate otherwise. While it is conceivable to have more than one wingman in an element, having more than one creates more danger of a mid-air collision without offering much advantage.
- Wingmate: A wingmate is a pilot whose starfighter belongs to your flight.
- Tail-end Charlie: Tail-end Charlie is a code phrases that stands for the enemy flying at the rear of a formation. Tail-end Charlies are optimum targets for the first attack run on a flight group.
Eight Fundamental tactics (from the Dicta Boelcke)[]
Developed by a long-dead starfighter ace who mastered the art of starfighter combat during the Sith Wars (in reality, these eight rules are the work of WWI German Ace Oswald Boelcke), these eight rules for starfighter combat are highly pertinent even thousands of years later, although with slight modifications.
1. Secure the upper hand before attacking.[]
In application, abiding by this rule means placing yourself in a position where your strengths are maximized and your foe's weaknesses are exacerbated. In atmospheric combat, attacking from a higher altitude is advantageous. In space combat, altitude is much less of a factor; however, moving into attack position from above or below the horizontal "plane" of battle can surprise your opponent. Also, using a visual disguise, such as flying with the sun at your back or with a larger capital ship obscuring your image, can be advantageous. Beyond altitude is understanding performance characteristics of both your craft and your foe's; for example, TIE Interceptors are better in a turning fight than X-wings thanks to their strong pitch and roll, but are not as good with rudder, especially in atmosphere, and do not accelerate or decelerate as well. An X-wing pilot would thus be sure to not come too close to a target; using their more variable speed to stay behind their prey even if the Interceptor survives the first pass and breaks.
2. Always continue with an attack you have begun.[]
Breaking off from an attack can be hazardous: not only are you no longer threatening your opponent, but a skilled fighter will seize the advantage you have surrendered and put you on the defensive. Only in a critical situation where your intervention will save a fellow player or the team should you break off an attack; otherwise, press and maintain the offensive.
3. Only fire at close range, and when properly fixed on your target.[]
Although fighters in First Strike carry an unlimited supply of laser cannon charges, Rule 3 applies to more than conserving ammo. Firing without an effective angle or beyond close range will not score a kill, more often than not. A few lucky shots may land and deal some damage, but especially when targeting a well-shielded or armored target, such as an X-wing or TIE Bomber, all the attacks do is alert the opponent to the threat (thanks both to the whizz of laser blasts and the damage indicator), giving them time to react and evade.
4. Keep eyes on your opponent, and do not be deceived by ruses.[]
Keep your eyes on your opponent as much as you can, while scanning your surroundings and checking your six o' clock from time to time. If you lose sight of your target, you're no longer attacking or operating from a position of advantage. In addition, the Starfighters in First Strike will not lose flight characteristics as they are damaged; an X-wing at 11% health is as maneuverable and deadly as an X-wing undamaged. If your opponent is in retreat and is showing signs of damage, such as trailing smoke and flames, do not be chivalrous and allow them to survive: go for the kill.
5. In any time of attack, it is essential to attack from behind.[]
This rule is true 90% of the time, and should be true 100% of the time if you're fighting in a lightly-armored craft. Deflection shots are extremely hard in First Strike without being extremely lucky or an extremely good marksman. Firing on a head-on pass exposes you to your opponent's guns, thus placing you in danger as well. Thus, attacking from behind is the favorable attack position. Use caution, however, when going up against craft that have turrets, such as the two-seater Y-wing. In these cases, attack from behind and below (if the turret is topside) or from behind and above (if the turret is on the bottom).
6. When first under attack, break towards your opponent.[]
If an attacker is targeting you, do not fly straight or break away from your opponent. Flying straight makes you an easy target, and breaking away offers your tail to your target for a longer period of time, which doesn't end well for you. Instead, break towards your opponent. Breaking into your opponent's attack does several things: one, it reduces your speed and causes your opponent to close much faster, overshooting as a result; two, if your opponent is attacking from range, breaking into the attack gives you a chance to return fire and cause them to break off themselves (especially if you're flying in a well-armored craft).
7. Be mindful of friendly and enemy lines.[]
In atmospheric combat, remember that a ground war is raging as well. Flying near enemy-controlled positions will likely invite anti-aircraft fire that will spoil your dogfight in a hurry. Conversely, flying near friendly airspace while being pursued will get you some support that may help shake your pursuer and give you a chance to take the offensive. In space combat, the same rules apply, except with regards to friendly and hostile capital ships. As such, when dogfighting, be aware of friendly and enemy lines, and thus be able to suspect a trap when your opponent starts retreating towards their own territory.
8. Fight as a group whenever possible, and do not commit multiple attackers to a single target.[]
The first part speaks for itself, but there is a reason why you do not want multiple shooters on a single target: they'll get in each other's way. Furthermore, if your group is outnumbered, committing multiple attacks on one enemy leaves more enemies that are not threatened and might be able to attack your allies, or you. This is not to be confused with fighting with wingmen at your side. When done properly, wingmen will not fire on a lead's target except when tactics dictate: their job is to keep pace with your maneuvers and cover your six if you are attacked during an engagement. Thus, having a wingman when you are attacking an enemy is not the same as having two attackers on a target.
Pursuit Types[]
90% of fighter-to-fighter kills take place in a pursuit situation, when the killer is behind the opponent. Depending on the situation, different types of pursuits may be applied; lag, direct, and lead. Remember that unless you're faced with a target it's important to destroy or drive off quickly, such as a bomber making an attack run on a mission critical craft, it is almost always a good idea to hold your fire until you have the target lined up in your reticule, as Rule 3 of the Dicta Boelcke states. This is particularly true when encountering fighters en-route to battle, who may not be anticipating attack. Firing too early will alert them of your presence and allow them to take evasive action.
Lag Pursuit[]

In lag pursuit, you steer your craft towards the wake of the victim's travel, which ensures that you have a wide field of targeting to work with. Lag pursuit is most effective if you're a great shot at a distance, are flying a less maneuverable craft, or possess the element of surprise. If you gain too much distance away, the opponent can easily turn around and initiate a head-to-head confrontation or attempt to blow past you. If successful, though, this maneuver puts you directly behind the enemy, and gives you an easy kill if he is unaware of your presence.
Direct Pursuit[]
In direct pursuit, you steer your craft directly toward the victim by putting him in the centre of your target reticule, neither lagging behind or leading him. This allows you to close in more quickly than normal, especially when they're flying perpendicular to your path of travel. If you have great skill with aiming at close ranges, or want to force the enemy to turn hard, use a direct pursuit.
Lead Pursuit[]
In lead pursuit, you steer your craft towards space in front of the victim, or where he is going to be. This pursuit type puts the target 'behind' your crosshairs, and should be used if you plan on firing your lasers while closing in, or if you want to close the distance between you and an opponent with superior speed.
Single-pilot Maneuvers[]

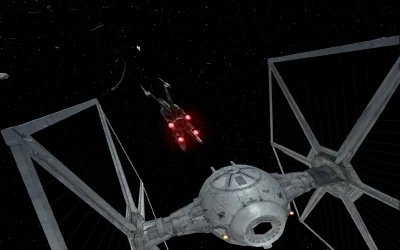
An X-Wing makes a kill.
Applicable to dodging incoming fire, shaking an enemy bandit off of your tail, and/or setting yourself up for an effective kill.
The Corkscrew[]
In a head-on confrontation or when approaching a space target with gun turrets, the corkscrew, known by some Alliance pilots as the Wotan Weave, will foil most gunnery attempts at middle to long ranges. To perform a corkscrew maneuver, roll your craft in one direction (left or right) continuously, while alternating up-pitch and down-pitch randomly. With a joystick, simply move the stick to the left, then alternate pulling back and pushing forward. You can track an enemy fighter if he's firing his cannons by the stream of lasers, use this stream to keep your course relatively towards him. When flying a TIE fighter, TIE Interceptor, or A-wing, the minimal armor on your craft necessitates this maneuver for survival. Be wary when performing this in atmosphere, as this may bring you dangerously close to the ground.
The Jink[]
When endangered by long range fire or missiles, you can also jink to help keep your course and avoid fire. Just pick a random direction to dodge in, using all three of your directional imputs, but keep your course pretty close to the target you're approaching.
Roll Feint[]
With an enemy right on your tail and using lead pursuit consistently, you can fake a banking turn (rolling towards the path you're going to turn on) by doing the roll in the direction you want to fake, then pushing the stick forward (pitching downward) and engaging boost (if available). Done correctly, the enemy will turn the wrong way, allowing you to accelerate clear of the engagement or get on his own tail.
Scissors[]
A speed happy pursuer can be shaken off with the scissors. Simply bank to the left, then roll and bank right, and continue banking back and forth. When your pursuer fully commits to your back-and-forth action, slam on the brakes while continuing to bank. The enemy will often overshoot as a result.
Barrel Roll[]
'Do a Barrel Roll! To Barrel Roll, press Z or R Twice!' Yes, it's the quote of a certain human-like rabbit in another "Star (noun)" genre, but even in Star Wars, the infamous barrel roll is effective for causing a foe to overshoot, or setting up into an optimal firing position at a foe's six o' clock, all without compromising speed. Do not confuse the barrel roll with just rolling, however. In a barrel roll, you roll your craft as if going around a barrel: this can be accomplished by pulling up, then rolling left or right while continuing to pull up; as you come over the top of the "barrel", use your controls to complete the 360* roll and put your weapons on target.
Floating Corkscrew[]
This maneuver is essentially the same as a corkscrew, but also involves a sudden deceleration. A dangerous tactic that, when performed successfully, causes a pursuing enemy to overshoot you and puts them in immediate strike range.
Nerf in the Headlights[]
Exceedingly dangerous, this head-to-head tactic takes advantage of a high disparity of speed between your craft and your opponent's. Only use this in some situations when you're flying a bomber against a enemy fast fighter and can take a few seconds of punishment (or if you have a VERY good gunner). When engaged with an opponent that's corkscrewing or jinking and still putting down a dangerous field of fire, slam on the brakes. An enemy pilot will often panic and break away before they collide with you, or will commit to a head-to-head collision, not realizing that you're moving very slowly; they'll get picked off by you or your gunner before impact. If they break, use your HUD to track them, throttle up, and give pursuit.
Be wary when using this maneuver in atmosphere, as you risk stalling out and crashing if you lose too much speed.
Element/Flight Group Maneuvers[]
A single pilot can inflict reasonable damage on the enemy; but a coordinated pair of pilots, or groups with three pilots and beyond, can demonstrate levels of damage and survivability unparalleled by individual action, and can readily impact the course of a battle. On the other hand, uncoordinated pilots forced by circumstance to work in tandem can lead to them getting in each other's way, resulting in unnecessarily dangerous flying and collisions. The following maneuvers and tactics are effective for coordinated squad combat. Several of these tactics also take advantage of formations. Use them to close in on enemies beyond visual range, or to attack targets you've made contact with.
The Bracket[]
 Instruction video being developed.
For 2 vs. 1 head-to-head confrontations, targeted against any fighter, bomber, or hot target (with guns). A flight leader and his wingman can utilize the bracket maneuver to divide a single target and his ability to make choices. At a set distance from a target, the flight leader breaks one direction while his wingman breaks in the opposite direction relative to a target. After a short amount of time, both pilots re-vector in on the target and fire. An enemy pilot is forced to pick one of the two pilots to attack; once he commits, he becomes especially vulnerable to the other pilot. An enemy gunner can only track one target... even if he forces one pilot to break off, the other one still gets in his shots. When flying as a pair, move relatively close together and agree on your target, breaking vectors, break distance, and attack vector interval. Then, execute the bracket.
Polar Break[]
For 2 vs. 1 confrontations (Pilots flying together) when a single enemy pursuer threatens either pilot from behind. Flight leader and wingman break in opposite directions (usually left and right) and force the enemy to choose either pilot. Both pilots monitor which member the opponent elects to pursue. The pursued pilot straightens his course away from the break point and jinks or corkscrews to dodge the enemy's fire, while the pilot not pursued continues and completes a 270* turn to place him in firing position against the opponent.
The Dropout[]
For 2 vs. 1 confrontations (Pilots flying together) when a single enemy pursuer threatens either pilot from behind. One pilot (usually the wingman) breaks out of the formation and flies perpendicular to the flight leader's course. Both pilots watch their HUD's or their sixes for the enemy's choice. If the enemy continues to commit to the flight leader, the wingman reverses his maneuver and heads back towards the flight leader; done correctly, the enemy should now be in firing range. If the opponent breaks to follow the wingman, the flight leader can break in the same direction and get on the foe's tail.
Head-to-Head[]
For 2 vs. 2+, also applicable to flight groups. If a flight leader and wingman are separated during an engagement and enemies get on both pilots tails, leader and wingman can find each other's positions and set up for a head to head encounter with each other. Once on a head-on course, the pilots then fire on the enemy behind his wingmate's tail. Two flight leader-wingman elements that are being tailed by multiple pursuers can accomplish the same maneuver.
Staggered Attack Run[]
For a flight group operating against a slow moving target, heavily armored target, or bombing run target zone. The flight group flies in formation (generally a box, Joe Bob box, or wedge) on a curved approach course that allows the group to near a target while still being difficult for gunners to hit or beyond gunnery range. Depending on the formation chosen, the pilots select a breaking order and interval, starting with the pilots closest to the target and further back in the formation, then choose to start the attack run. Each pilot breaks to engage the target in the prescribed order, resulting in a loose trail formation relatively close to the target. Each pilot makes their attack, then retreats from the target and stands by to reform the formation.
A Staggered Attack run is brilliant for bombing attacks on a single hardened target, be it with bombing runs or torpedo attacks. It's also an excellent means of wearing down a Gallofree transports shield boosters in Escape From Hoth, since the attack is prolonged and not all warheads strike simultaneously.
Unison Attack Run[]
For a flight group operating against a series of ground targets, bombing run target zone, another formation of fighters, or an unusually large target. Like the staggered attack run, the flight group flies in formation on a stand-off approach course; generally for this attack run, the formation will have vertical displacement with all fighters (examples include the Stack, Ladder, and a sideways Box formation). At a set time or distance, the flight leader orders the group to break and engage the enemy all at once.
Perfect for inflicting a lot of damage in a widespread area, Unison attack runs are great for carpet bombing enemy forces or putting a lot of hurt on an unsuspecting capital ship. A suspecting gunner will have a field day if he tracks the formation, so be wary.
Burst Attack[]
For a flight group operating against any single hard target with defenses. The flight group takes up formation and gets into position to attack an enemy target from a vector where only one gunner can respond to all of the pilots. Depending on the formation used (Box is great, but Stack works as well if coordinated properly), the squad decides on breaking directions (and order, if it's an especially tight formation). The group takes a direct approach path, then each pilot breaks and vectors perpendicular to their target. Upon a few seconds of travel, all of the pilots then turn and assault the target from four different directions.
Like the bracket, the Burst Attack forces the gunner to pick and choose which fighter to attack, to the point where at least one of the attacking fighters will hit their marks with their warheads.
Related guides[]
Advanced: